Quantcast
Channel: MessyJesse - a quilt blog by Jessie Fincham
Viewing all 205 articles
Browse latest View live

Filofax Original, A5

$
0
0
Yippee! Last week I got my brand spanking new Filofax A5 Original! Now this post may seem completely alien to some people - getting way too excited about an organiser! but rest assured there are ALOT of other Filofax and planner nerds out there, trust me... 

This is my first Filofax, but I got into using a planner last year when I had the Martha Stewart binder system. I felt I needed something to help me on track with things as I increasingly kept forgetting important dates while trying to keep up with the shop/blog/day jobs/house projects etc. and I need the physical element of 'writing things down' to help me remember, I couldn't cope with just an iPhone for organising myself?

The MS one worked great, and really got me into being more organised (most of the time) but the downside was that I bought it off Ebay as it's a U.S. only product and I couldn't get hold of the 2014 refills so I figured it was high time to switch it up to a British made Filofax so I could update my refills easily. Hooray!

The other reason I updated my MS binder was it got dirty, I mean *really dirty* from being thrown about in my handbag, so the first thing I did after setting it up - with DIY'ed dividers I will add ;) and generally admiring it for a little while, was make a dust-bag! 


Since the organiser is such a vibrant yellow I felt inspired to do a bit of a Kate Spade homage with stripes and dots in bright colours. I think it sets it off really well. I came up with the bag pattern myself as I wanted it to be a perfect fit for my A5. I took some photo's along the way and I'll share a little tutorial on the blog very soon. 

Here's to a organised 2014! How will you be staying organised and on track this year? xo

Liberty Tana Lawns

$
0
0
Aren't these the prettiest fabrics you've ever seen!! They are gorgeous Liberty Tana Lawns; below are a mix of classic and new season prints. They have such a beautiful feel to them, like no other fabric. I was kindly gifted them to work on a Valentines project, so I've decided on a fabric envelope and handmade card. Watch out for a finished version and tutorial soon ...

Drawstring Dust-Bag Tutorial

$
0
0
So last week I gushed about my new yellow Filofax Original, and how I just had to come up with a dust-bag for it. Today, I'm sharing the super easy drawstring bag you can make as well, of course the Filofax is optional ;) 

The finished bag size is 13" x 10", a perfect fit for the A5 Filofax! 


Cutting
Bag fabric (2) 11" x 15 1/4" 
Fabric Ties (2) 32" x 1"

1. Cut your fabrics out as above.


2. Along the longer side of your fabric bag piece, measure down 2" from the top. Cut 1/2" into the fabric. Repeat for the opposite side, and again on the other fabric piece.


3. Fold and press 1/4", and then again to enclose the raw edges. Repeat on opposite side and do the same for the other fabric piece.

4. Sew very close to the edge to secure in place, remembering to back-stitch at the top and bottom, repeat as before.

5. Fold over the top edge 7/8" and press. Now fold over the top edge of the bag piece to meet at the point of the side slits.


6. Place your bag pieces right sides together and pin in place. Sew 1/4" around the edge. Do a little back-stitching to the top for extra strength.

7. Trim your raw edges with some pinking shears to keep it neat. Now for the fun part of turning your bag inside out!

8. Now for the fabric ties. For these, I've basically made them in the same way as Jeni does in her lined drawstring bag tutorial - only these are thinner. Take your fabric strips and fold and press the short ends over 1/4" and sew to secure. Carefully press them in half lengthwise (wrong sides together).

9. Now open them out flat again and press the raw edges to the centre line you have just created. Fold in half again, enclosing the raw edges.


10. Stitch a strain line very close to the edge of the fabric ties, being careful to catch both sides of the fabric - it can be a little tricky!


11. Take a large safety pin, and poke one end of the fabric tie into the bag casing - come full circle to the beginning again.


12. Now starting with the other side, repeat by poking the fabric tie all the way around and back to the start. You'll know you've done it right when you are able to pull the handles and it tightens the bag! Tie a knot in either end of the bag handles. 


Done! Now enjoy your newly made dust-bag! Or drawstring bag to tote around whatever you need. Let me know if you have any questions, and I'll do my best to help. xo 

Fabrics used
---
Yellow stripe, IKEA

Scrappy Irish Chain

$
0
0
My scrappy Irish chain quilt has taken a bit of a back seat for the last couple of weeks, when I first started on it I didn't stop! Every chance I could escape up to the sewing room I was working on it. I love it when projects get you like that. It's been on the back-burner as I've been sewing up a storm of mini quilts recently, (more on that in another post / and follow me on Instagram @messyjesse1 to keep up to date!). I did a bit of a sewing room deep clean as well; culled lots and cut up tons of vintage sheets that I had piling up. So I have a bunch of vintage FQ packs and scrap bags for sale in the shop, which have proven to be very popular already :) 


Now I'm ready to get back to this. Hoping to find some time in the evenings this week, and with the stormy weather we've been having recently it's certainly helping my sewing time! 

Liberty Valentines Card and Envelope DIY

$
0
0
Do you remember those beautiful Liberty fabrics I featured on the blog here recently? 

Well, they have now been turned into a super sweet Valentines card and envelope which you can all make too. I have a little tutorial and Q&A over on the Liberty Craft Blog, so if you've ever wanted to find out why I have the blog name 'Messy Jesse', or how I run my Sew and Quilt shop along with having a day job and being a blogger (spoiler alert; I have no social life!) or what I have planned for the coming year? Head on over and take a read.


I have lots of fabric leftover from the project, so I know I'll be working them into some projects soon. I'm so excited! Have a lovely weekend. xo

Mini Mad

$
0
0
My Instagram pals (I'm @messyjesse1) will know I was a sewing demon last week! I'm not sure if it was my super tidy new sewing room, the awful weather we've been having or a batch of new fabrics to motivate me to hibernate in-doors and sew.non.stop. but whatever it was, it worked. It also helps that Camille Roskelley makes the cutest patterns


I had such an urge to make the lovely Spools mini! The spools were all random pieces from my scrap pile, so it was a happy coincidence that it all worked together nicely. The brown reels fabric is a print I use again and againchocolate spot by Darlene Zimmerman - it's so useful! I literally had so much fun making this I finished it in one sitting! which is really fast for me as I'm a sloooow quilter… 


Next up is the little house mini, I already had one block started from way back - I seem to remember it taking forever to make that first block, so I got put off and left it for ages, but weirdly I whipped up the new blocks in no time, funny how quick you can be when you're motivated! and I just love the navy check binding. The pattern for this one came from a book called Make Mine Mini, you can find the amazon link on the sidebar (thanks for clicking through!).


Since I had such a hoot making the Spools mini, I thought I would try my hand at the Swoon mini next! This didn't come together as quickly as the others, mind you. Though once I got my cutting done and did a test block the others came together much easier - and it would have been a lot quicker had I have not chosen a directional print for one of the blocks! Note the outwards directions of the red scallop print, yeh that didn't come easily :/ 


So I've gone a bit 'mini-mad' of late, and I love it. I took my fabric pin-board down that was above my desk in favour of the new mini's - a la Camille. It's so fun seeing them all the time now :) and I've already finished another mini for my kitchen too! Let's see how long this productive quilting gravy train will last… have a great week friends. xo

More Mini's

$
0
0
Next up on the mini quilt train is this super cute apple design by Lori Holt. I fell in love with the apple's from the Quilty Fun book the moment I saw it and immediately put it on my 'sewing to do list'. 


The pattern originates from a full size quilt, but I knew exactly what I had in mind for these delicious apples ;) I also already had the fabrics chosen in my head (this usually happens when I plan my quilt projects). I'm so happy with how it looks in my kitchen on my vintage yellow cabinet. You can see it from the living room, so it's nice to have a touch of Lori's fun and happy personality in my home now.

One of the reasons I love making mini's at the moment is being able to try out new quilting designs without committing to a huge piece. For this one I tried a scallop design - I adore anything scallop! I used an acrylic circle template to draw half circles with a water erasable pen and followed the lines with my walking foot.


Ok, so to those who think I'm completely addicted you're right. I am, but to my defence this one was made before Christmas, I just haven't got round to sharing it! Again, from the Quilty Fun book, this one was a gift to my nana, who uses it as a table centre in her kitchen - she has a blue theme going on in there so I thought I'd stick to the colour theme. We all like a bit of matchy, matchy in our family. 

The Swoon Block

$
0
0
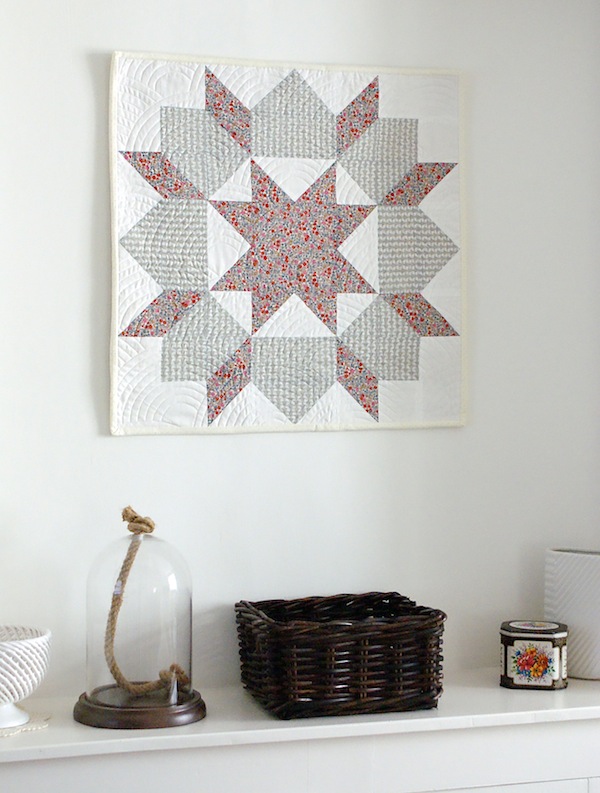
Happy Monday friends! Hope you've all had a lovely weekend? I had a productive one cracking on with some blocks for my much neglected Farmers Wife quilt! More on that in another post ;) Today I wanted to share a new Swoon block mini I finished up recently! I have to say, I couldn't be happier with how this turned out. Honestly I think this is one of my most favourite things I've made. Really.


I completely fell in love making the Swoon block (by Thimbleblossoms, you can find it here) it was such a pleasure to piece. I'm not so accurate with teeny tiny piecing, so I throughly enjoyed working with such a big block. I hadn't actually realised quite how BIG the Swoon blocks were until I finished it up and held it next to me! 


The fabrics are Liberty Tana Lawns, they really are so beautiful! (thoughts on stocking them for my Sew and Quilt shop?) You really get to see the fabrics with this design so I think it shows them off well. I use Kona Snow for the background, and le creme swiss dot in cream for binding, so as not to distract - I seem to favour a neutral binding in my projects, I think? 


I also tried a new quilting technique which I've always admired; baptist fans! Yep. Love those curves! It now hangs pride of place in our living room :) 


Perhaps, a full sized Liberty Swoon quilt is in order next? ...

Farmers Wife Quilt Update

$
0
0
Oh how I forgot how much I love working on my Farmer's Wife Quilt. I cracked on with 12 new blocks over the weekend and had a blast! but yikes, did I forget how labour intensive they were!? These pretty 6" blocks may look relatively easy peasy to some, but not me :/ I'm finding some of them quite the challenge! Especially the one's with flying geese units, I'm avoiding those blocks at all costs now… 

An enjoyable challenge, but a challenge nonetheless. I think my general piecing accuracy has definitely improved over time so I'm looking back at older blocks and thinking "what?!". I'm also finding that since it's taking an age to complete my taste is changing as well, so I may need to update some blocks, oops! I'm also in a quandary about adding solid white to some blocks, until now I had only used patterned fabric? Now I'm undecided.


I've been making the blocks in sets of four at a time and chain piecing as much as possible - following Camille Roskelley's FWQ tips. She recommends doing them six at a time but I don't think I have a workspace that allows me that so I can get into a bit of a muddle doing it that way.  


How's your #fwqal going?

PS. apologies to some of my lovely readers who are kind enough to leave comments but I haven't got back to you! A lot of comments are not being fed back to my email account so I haven't been able to reply, agh.. blogger can be a nuisance. Oh, and you may notice a picture of MEEE! on the blog now, I know? what was I thinking!? but I figured it was high time to have a permanent photo of my on here - like every blogger. I've been meaning to do it for years but I never have photo's of myself, and I had to take one of myself the other day for a publication so I figured I would post it here too! Maybe the fwq blocks may distract you anyway ;) xo

Spell It With Moda Blog Hop!

$
0
0
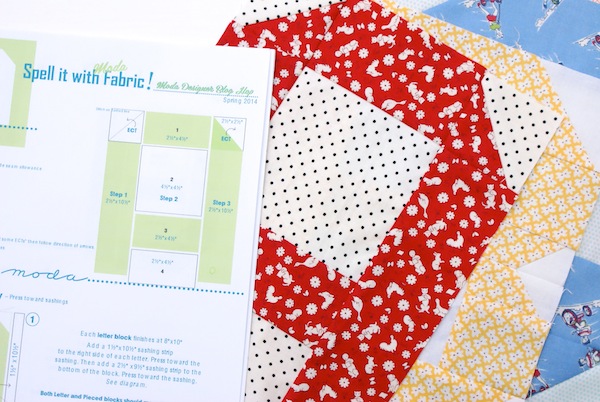
I haven't joined many quilt-a-long's in the past but I have to say I'm beyond excited for the Spell It With Fabric blog hop by Moda! If you haven't heard about it before, Sandy Klop and Moda have released an alphabet quilt pattern that showcases her story of designing American Jane fabric collections through the years. Throughout the bog hop from the 17th - 28th Feb you can collect the alphabet letter patterns to make the quilt! Yay! along with interviews and prizes. 

I had so much fun making the first A, B, C, I whipped up the rest of he letters in no time! I'm planning on making the full alphabet quilt, which finishes up at 64" x 93" (using the original version, which you can see here). I know some people are planning on mini's with just their initial - I want a 'J' mini on my sewing wall too! :-) This is going to be a baby quilt for someone very special! >.< so I'm going for an American Jane/schoolhouse'y look using lots of bright primary colour's and cute 1930's novelty fabric for the letters and a mix of Kona Snow and low volume fabrics for the background. I'm so inspired by Sandy Klop aka American Jane. She produces some amazing patterns I would love to try someday, I love the sampler quilts she creates using rich primary colour's - like this and this


Here's the link to the complete blog line-up, where you can find the patterns as they become available. You can also follow along on Instagram using the hashtag #spellitwithmoda - that's where I'm posting mine. Right, I'm off to print out the new letters and get sewing! 

Are you joining? 

This Week: Update

$
0
0
This week I've been busy finishing up a hugely big WIP, remember thatIrish Chain quilt? Yep. I finished it yesterday, I'll be back next week with a full post on it after I've had some photo time with it ;-) So as a little treat for finishing, last night I finally got started on the cutest little mini Dwell quilt by Thimbleblossoms. I purchased it recently at 30% off! Camille is having a sale as part of the Moda blog-hop. You can find the details about it here


(don't ask me why I seemed to forget to make the middle house!?) I think I needed another instant gratification project after that monster! If you follow me on Instagram (@messyjesse1) you would have seen a sneak peak of the finished Irish chain quilt yesterday! 


I've also worked on some more letter's as part of the Spell It With Fabric QAL. I love working on these, they're so bright and happy. I'm up to 'O' now, so I'm starting to think about sashing and borders etc now I'm coming nearer to the finish line. Right, I'm off now. Just had a big box of Tasha Noel's latest collection'Country Girls' delivered, which I've got to get listed in the Sew and Quilt shop asap. Oh it's a hard job! Have a great weekend guys. xo

Double Irish Chain Quilt!

$
0
0
Finished. At last! My double Irish chain quilt has been waiting very patiently for me to find the motivation to baste and quilt this beast! 

I'm so pleased it's finished as it's now sitting proudly in my bedroom. It just fills the space with such a sunshiny, spring feeling when I walk into the room now. I've always wanted a happy yellow quilt, and an Irish chain has always been such a simple but striking pattern to me - so I liked the idea of blending the two. I'm not usually one for adding border designs of sorts, but I think the diamond border adds something extra to this otherwise conventional design. The backing fabric is a vintage sheet I've been keeping safe for a long time for 'that perfect quilt', I just love it. It's one of my very favourite vintage sheet patterns and I think it really ties everything together so well.

For quilting I did straight lines either side of every seam, stopping at the white centre's. I had planned to do some free motion design to fill the space, but I didn't quite have the confidence to do it once I'd done the rest of the quilting... I'm not entirely happy with that part in all honesty, but "I can't think about that now, I think about it tomorrow!" ;-) perhaps I could come back to it later? I'm getting to the point now when I just need to spend some more time actually practicing FMQ, instead of thinking I may just magically be able to do it one day? I chose Kona White for the binding to blend seamlessly with the rest of the quilt and it looks just great against the vintage sheet backing. 

Now let's basque in these Spring like photo's for a moment and pretend it's not March, and very, very cold...


Finished size: 88" square 
-----
Block size: 10"
----
Fabrics used: Happy Go Lucky Penny Dots, Aqua / Kona Lemon / Kona White
vintage sheet for backing

Scrappy Irish Chain Quilt Pattern

$
0
0
I have an exciting pattern for you all today! The scrappy Irish chain quilt I've been working on. I've just finished the quilt top so I thought you would all like a free tutorial to join in too!? So do you have your scraps in order? Great, let's get started. 


Scrappy Irish Chain Quilt / Pattern by Jessie Fincham

Fabrics used: Essentials 100% cotton white / Kona Peony / Scrap Fabrics (mostly from Sew and Quilt)

Finished block size: 18.5"
Finished quilt size: 90" square

Materials Needed

2 1/4 metres white fabric
1 1/4 metres pink fabric
4 1/4 metres range of scrap fabrics
3/4 metre binding fabric
7 1/4 metres backing fabric

Cutting

1. From the white fabric cut the following:
   - (12) 18.5 x 6.5"
   - (24) 14.5 x 2.5"
   - (24) 10.5 x 2.5"
   - (24) 6.5 x 6.5" 
   - (52) 2.5" x 2.5"

2. From the pink fabric cut the following:
   - (300) 2.5. x 2.5" sqaures

3. From scrap fabric cut the following: 
   - (989) 2.5" sqaures

If it helps, you can use the diagram below to guide you with the cutting of the white fabric. Cut carefully! Note: (33) 2.5" squares will be cut from the extra 1/4 metre not pictured below. Also it is not to scale! 


Block Assembly

There are two blocks to make for this quilt, simple enough.

Block (A) 

Sew your 9 strips as shown (A1). Taking note of the layout of the pink and white squares. Press strips in alternating direction to 'nest seams'. Sew your rows together to make one block. Press seams outwards. Complete (13) blocks total.
(A1)
Block (B)

Sew your 7 strips together as shown (B1). Press strips in alternating directions as block (A). Sew your rows together to make one block press seams outwards. Complete (12) blocks total.

(B1)
Quilt Assembly 

Sew your blocks together in a 5 x 5 layout alternating between block (A) and (B). Make a quilt sandwich with quilt top, batting and backing fabric. Machine or hand quilt as desired and bind using (9) strips 2.5" x WOF, stitched together end to end using your favourite binding method.


I hope you enjoyed this free pattern! Link up on your favourite social media site with the #scrappyirishchain hashtag. You can follow my progress on Instagram @messyjesse1

© March 2014 Messy Jesse
Designed by Jessie Fincham
Please respect my hard work in creating this free pattern. Do not sell or re-distribute my tutorials. Feel free to direct people to my website or link to it.

Great Granny Squared Book Giveaway!

$
0
0
Lori Holt's latest book offering is the fabulous Great Granny Squared book, published by Sew Emma as part of the Fat Quarter shop. I was lucky enough to receive two copies, one for me and one for a lucky reader! I received it at the weekend so I've had some time to page through the quilty eye candy. Would you like to see more? ...

I think it's safe to say, I love granny square quilts! So I knew Great Granny Squared would be just my cup of tea. The first big sized quilt I made was a granny square design, so I will definitely be making one of Lori's cute projects from the book. I loved the navy (my fav quilty colour of the moment) 'Bonus Quilt' so much I just had to test out a block to share with you all ;-) 

I loved reading about the 'great granny' name too. The baby, the mama, the granny and the great granny! So cute. I just love that. It's smaller than Lori's first book Quilty Fun, but packed with some great projects. It includes complete instructions for two quilts, a table runner, a pillow and two embroidery designs for use as quilt labels. So comparing the price tag of $13.95 for a multitude of projects versus a regular one-off quilt pattern at the same price it's really great value! And as always, Lori provides really clear instructions and diagrams to follow along. As well as the all important happy vintage photo's of Lori's colourful home dotted throughout the book! Coincidently, Lori's latest line of fabrics is called Vintage Happy! see what I did there ;-) Congratulations to Lori on another fantastic book! 

Ok so you all want a copy now, yes? Good. Here's how to enter:

1. Become a blog follower (if you aren't already) and leave a comment on this post.

2. For an additional entry you can re-post on Instagram with the #greatgrannysquaredgiveaway hashtag and tagging me @messyjesse1. Leave a comment to count additional entry.

[Competition closes 21/03/14, a winner will be announced here on the blog, so be sure to check back. Competition open worldwide]

Be social, please share! Best of luck folks! xo

Spell It With Fabric Quilt Top

$
0
0


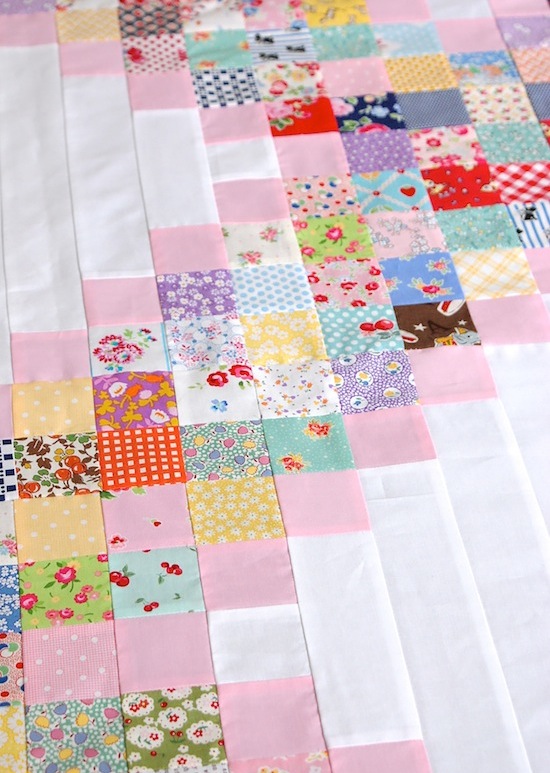
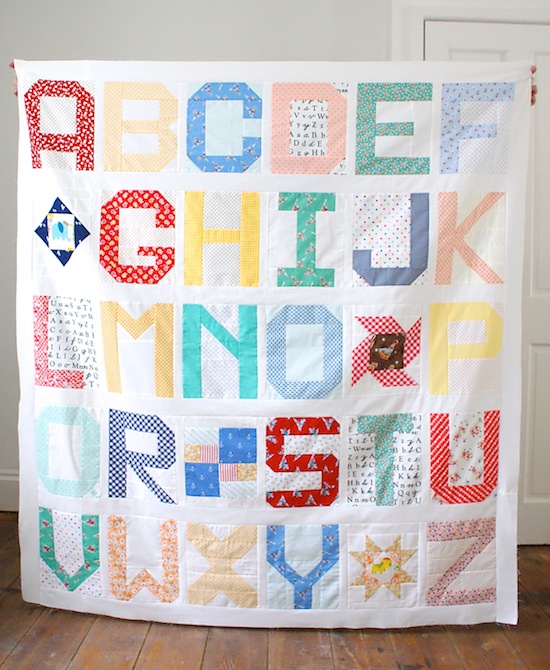
Super happy to share my finished 'Spell It With Fabric' quilt top today! I've really enjoyed making this quilt, choosing all the bright and fun fabrics. My IG friends have been following along my block updates with the #spellitwithmoda hashtag. 


For the filler blocks I chose to do some fussy cutting from a cute animal printed linen fabric I got from Etsy, a million moons ago - and a brown Lecien print which is one of my all time favourites. I actually finished the blocks over a week ago, but only sewed the top together this morning as I was procrastinating about the sashing… I thought I would do scrappy sashing in a mix of low volume prints, the same as the letter backgrounds but having it laid out next to the blocks, it looked a little too busy so I went with Kona Snow. I set mine with 2.5" borders, as apposed to the wider border measurements given in the setting instructions by Moda as I wanted it smaller. It measures about 55 1/2" x 60". 

Now decisions for the backing and binding? I've got a few prints on order for American Jane's latest collection, Ducks In A Row for Sew and Quilt. I'm thinking a red pezzy print for binding could be perfect! Though I don't know how long I'll be able to hold off finishing it… 

If you fancy making this quilt as well you can find the free pattern available as part of the Spell It With Fabric blog hop via the Moda blog. Next up I'm planning a 'J' mini for my sewing room wall! ;-) because I need another one. OK. 

How To Hang A Mini Quilt - From Hanging Sleeve to Wall!

$
0
0
As you may have noticed recently I've been up to my eyes in mini quilt-making to decorate my sewing room wall. I've been hanging them up with strong parcel tape which has been working well for my really 'mini' one's, as they're so small and I can move them around without worrying about holes in the wall. However,  for my larger Swoon mini quilt I needed a more permanent fixture to hang snugly in our living room alcove. So today I thought I would show you how I made a hanging sleeve to give a nice professional finish. Let's get started.


1. Measure the width of your quilt. Cut a piece of fabric that measures the exact width of the quilt x 7". I like to use the same fabric as used for the backing to blend seamlessly. 

2. With the shorter ends of the fabric, press 1/2" and then again by 1/2" enclosing the raw edges. Sew.

3. Fold in half lengthwise, and sew with a 1/2" seam.

4. Centre the hanging sleeve, and press the seam (you have just sewn) flat. Press well here. 

5. Re-gig the hanging sleeve slightly by sliding it downwards by about 1/4" or so. Press well. This allows for some extra slack when the dowel holds the quilt up - without this the dowel may bulge out slightly.

6. Position the hanging sleeve on the quilt by about an 1" from the top. Keeping in mind in needs to be low enough in that the sleeve is not shown when hung from the wall.

7. Pin in place, and hand sew around all sides. Be careful to only sew through the backing and batting, not the front of the quilt. 

8. Cut a length of dowel just shy of the quilt length. Slide through the sleeve. Hang two picture hooks on both ends of the dowel and position where you want the quilt to hang on the wall - mark two pencil lines where the picture hooks are and hammer them in. 

Hang your lovely mini quilt on the wall, and admire your work! 

Pssst. Don't forget to enter my giveaway to win Lori Holt's latest book; Great Granny Squared. Competition closes tomorrow, enter to win here

Great Granny Sqaured Book Winner

$
0
0
So, including all the comments and additional entries for IG folk. The lucky winner of Lori Holt's latest book 'Great Granny Squared' is…

Fabulous looking book - my fingers and toes are crossed!!! I am a follower :)
Congratulations Amy, I've just sent you an email. Thank you to everyone for entering. xo

Cargo Duffle Bag

$
0
0
Guys, I made a bag! Yep. The Cargo Duffle by ever so talented, Anna of Noodlehead. I'm so excited! I haven't made a bag in such a long time, and I've not tackled a big project like this one before so you could say I 'm rather pleased with myself :-) 


I haven't been big on bag making in the past, but this design really caught my eye because 1. It was a nice simple shape 2. I really needed an overnight bag (I sold my old CK ones on ebay a while back) and 3. This is a free pattern, people! So there was really no excuse I shouldn't try it. I think part of the reason why I haven't made many bags before is because I'm not really into the handmade bag look? You know I love the brighter, cute fabrics for quilting and other sewing projects but it just wouldn't fit my personal style to carry that off in a bag form. So for this, I knew exactly what I wanted. 

Black! Yes, a black bag! Oh how exciting ;-) but I know it will definitely get used. I really love the caramel coloured bottom, I think it gives it a bit of a luxury feel. Before I had a proper read of the pattern I assumed (stupidly) it was lined so I purchased some yardage of the Michael Miller Mirror Ball Dots as I thought it would be the perfect amount of 'jazzy' for the inside. Thankfully I found a couple of tutorials online to make the duffle bag with lining. I machine stitched the lining to the bag, and hand sewed at the sides near the zipper ends for a clean finish, as I knew I would never get it neat with the machine. 

I found the construction pretty simple on the hole, considering I'm not an expert in the bag-making area. However I really struggled when I was sewing the top and bottom panels to the side panels, but eventually I got there. That was the only real hiccup I faced. If I'd have to change something about mine, I wish I would have chosen navy for the pocket lining as I did the outer pocket - not the MM Mirror Ball fabric as I did. It's only a small thing, but it shows through the front at some angles and it really bugs me. I actually re-did the pocket flaps while I was making for that reason but didn't bother to redo the main pocket section. I've also not added the snaps for the pockets yet, I initially forgot all about them when I took these photo's but now I'm kind of liking it without? I may add them at a later date. I did add a coordinating navy zipper pull, which I think may be my favourite part!

Cargo Duffle - Pattern by Anna Graham, available here
-
Fabrics used: Kona Black / Kona Wheat / Kona Navy / Michael Miller Mirror Ball Dot, Rice

There's been a few finished cargo duffle bags popping up on the blogsphere recently, so I thought I would put my two cents in on completing the bag:

Jessie's Tips: 

-  Head over to C'est la vie's blog and follow her sew-a-long. She's amazingly gone through every step of making the duffle bag and broke it down in easy peasy instructions. I don't think I could have done it without that!
-  I used this tutorial by Small Town Thread for the lining addition. I'm a visual learner, so I need pictures - even simple steps always helps with a photo! 
-  Make sure you have the latest Cargo Duffle bag pattern printed. I had the older one initially when I was at the cutting stage, doh! and later downloaded the newer one which has more detail and in assembling the bag and  making the pockets. Oh, and much simpler cutting instructions. Essential. 
-  Anna has some great tips where people have been getting into trouble on construction in this post here
-  Label your pattern pieces. I cut up bits of paper with 'bottom gusset' etc pinned to each section and had it all laid out in piles on the floor which really helps, if like me - you chose to use a lot of one colour fabric. 
-  Square up your front and back panels. They can get wonky after the quilting section, so make sure they are definitely squared. It makes assembling the front/back panels with the gussets a lot easier, and you're less likely to get bunch's - and a wonky shaped bag! (which I think mine is!).
-  Use matching thread on the assembly section, I accidentally had a white thread in my machine when I first tried only to realise it showed through against the black. 
-  Not essential, but personally I would say use a metal teethed zipper over plastic. They give a more professional finish and are more durable in the long run.  


Ok, so I already have plans for another one! … I'm thinking plain off-white canvas for outer - no lining and strip of, maybe orange neon for the coordinating base?! Perfect beach bag I'd say. Watch this space ;-)

Vintage Fabric Destash Sale!

$
0
0
I had a clear out of my sewing room a while back, and somehow I'm only now getting round to clearing the stuff I don't want anymore, oops! Below are mostly vintage fabrics and curtains I've been collecting over the years. So before I put them on Ebay (because I try to avoid Ebay at all costs!) I thought I'd give you guys the heads up, so you can have first dips on anything that takes your fancy? 

If you want to buy, just drop me an email to: hello@messyjesse.co.uk 
Stating the number you wish to purchase, and your shipping country.

I'm happy to ship worldwide if needs be. Shipping to UK is £2.95 per item. Please contact me if you are elsewhere and I will give you a quote. Pricing is listed below each item, or best offer if things are slow. First come, first serve! xo


1. Dress fabric - peachy/pink, very silky feel to it, most likely polyester 84cm x 1.5m / £4
2. Dress fabric - Very retro blue/purple print 90cm x 2.7m / £5 SOLD
3. Light-weight gauzy fabric - cotton. Handkerchief, square print 1.2m x 2.9m / £5 SOLD
4. Cheesecloth dress fabric - cotton. Beige and pink floral 90cm x 2.95m / £5 SOLD

5. Pair of curtains: 1.1m wide x 1.8m drop (each) / £9
6. Pair of curtains: 88cm wide x 1.8m drop (each) / £9
7. Curtain panel: 1.1m wide x 1.35m drop / £3.50
8. Pair of curtains: 1.25m wide x 1.3m drop (each) / £9


9. Pair of curtains: 1.2m wide x 1.35m drop (each) / £9
10. Large bedspread with fringing on three sides, measures: 70" x 100" / £20 (inc. UK shipping)
11. Pair of hemmed fabric panels: 80cm x 1.75m / £9 SOLD
12. *Beautiful* vintage 1940's curtains: 1.15m x 1.35m £9


13. (OOP) IKEA fabric, red 3m / hearts 2.8m / £4 (each) SOLD
14. Cushion cover with bow front, pink vintage fabric / 13.5" square / £4.50
15. Cushion cover with bow front, purple vintage fabric / 13.5" square / £4.50
16. Range of handmade knitting needle organisers (x20 slots over two rows/magnetic snap closure) approx. 17" tall x 16" wide / £9 (each)

Oh, Another Mini Quilt*

$
0
0
I did it again. More mini quilts in the bag, or on the wall I should say. 

I really can't stop making these still, they're too addictive! After finishing my Moda alphabet quilt top recently, I hadn't quite got the alphabet letter's out of my system so I made a 'J' for moi and an 'R' for my friend's little boy; Ruan. She's just moved to a new house so I thought it would be a fun moving in present ;-) 


I added the star like Camille has on her mini, for a little something extra as it's quite plain without. You can find the tutorial to make the tiny 2" block over here on the Temecula Quilt Co. blog. Now I made this teeeeeny tiny star at almost midnight - not advised, and I vaguely struggling with the cutting instructions, which was probably due to my inaccurate reading at such a late hour but just double check to be sure ;-) ... and don't try making it at midnight, K?

Next up is the Dwell mini, I finished this a couple weeks ago but realised I never shared the finished piece. I just love that scallop quilting pattern, I then echoed that with my favourite scallop print.


Oh, and then I had to make the Rise and Shine mini as it was just released along with some other fantastic Thimbleblossoms patterns. I used the amazingly cute 'Betty Dear' by Darlene Zimmerman charm pack

I'm fast running out of wall space now so I may have to stop soon... we'll see? 

Viewing all 205 articles
Browse latest View live